Monday, April 8, 2019
Monday, March 25, 2019
Wednesday, March 13, 2019
Monday, March 4, 2019
ASP.NET CORE: Sending Email with Gmail and Hotmail Account using ASP.NET Core services
Monday, March 04, 2019
Vikas Sharma
C#: Parsing HTML Table and Loading HTML Webpage using Html Agility Pack
Monday, March 04, 2019
Vikas Sharma
ASP.NET Core: Step by Step Guide to Access appsettings.json in web project and class library
Monday, March 04, 2019
Vikas Sharma
In ASP.NET Core configuration API provides a way of configuring an app
based on a list of name-value pairs that can be read at runtime from
multiple sources.Its time to get over with web.config to store and
access appSettings keys. Please note that class libraries don’t have an
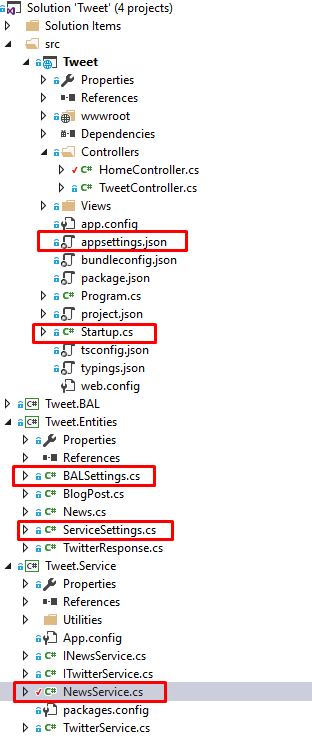
My appsettings.json
Step 1: Create Model/Entities classes that has properties that match the settings in a section in
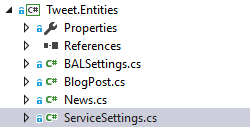
Create a class for BALSettings
Please note that in case you want to access the section of appsettings.json in class library project, then create above entities class in separate class library project in order to avoid circular dependencies conflict between projects in one solution. There is strong chance your web project might be dependent on that class library project.

Step 2: Register
You need to get the appsettings.json section and then bind it, It is
done by populating relevant model classes and adding them to the
Step 3: Access
You can access that class from any method that the framework calls by
adding it as a parameter in the constructor. The framework handles
finding and providing the class to the constructor.
Include Microsoft.Extension.Options in controller to work with IOption collection.
Step 4: Access
Asp.Net Core DI resolve all dependencies before creating controller.
As we have already registered our model classes which are containing
relevant sections of appsettings.json in startup code.
I have a class library project and I am accessing appsettings.json section in it using below code.
If you want to access appsettings.json key/value data in class library project then you have to add Microsoft.Extensions.Options from NUGET to your relevant class library project, otherwise IOptions collection wouldn’t be accessible to class library project.
Nuget package manager console command:
appsettings.json
by default. The solution is simple to access appsettings.json key/value
pairs in your project through Dependency Injection principle in ASP.NET
Core. DI has been already part of Core framework, You just have to
register your dependencies in startup.cs file under ConfigureService method.My appsettings.json
{
  "ServiceSettings": {
    "NewsMainUrl": "https://newsapi.org",
    "NewsApiKey": "abc"
  },

  "BALSettings": {
    "Source": "xyz",
    "FilterTerms": "abc;def;"
  }
}
Step 1: Create Model/Entities classes that has properties that match the settings in a section in appsettings.json
Create a class for BALSettingsnamespace Tweet.Entities
{
public class BALSettings
{
public string Source { get; set; }
public string FilterTerms { get; set; }
}
}
Create a class for ServiceSettingsnamespace Tweet.Entities
{
public class ServiceSettings
{
public string NewsMainUrl { get; set; }
public string NewsApiKey { get; set; }
}
}
Please note that in case you want to access the section of appsettings.json in class library project, then create above entities class in separate class library project in order to avoid circular dependencies conflict between projects in one solution. There is strong chance your web project might be dependent on that class library project.

Step 2: Register appsettings.json section with relevant model classes in DI container
You need to get the appsettings.json section and then bind it, It is
done by populating relevant model classes and adding them to the IOptions collection in the DI container and then registering them in Configure() method of the Startup class of ASP.NET Core project// This method gets called by the runtime. Use this method to add services to the container.
public void ConfigureServices(IServiceCollection services)
{
services.Configure<BALSettings>(Configuration.GetSection("BALSettings"));
services.Configure<ServiceSettings>(Configuration.GetSection("ServiceSettings"));
}
Step 3: Access appsettings.json section in MVC or WebAPI controller in ASP.NET Core Project
You can access that class from any method that the framework calls by
adding it as a parameter in the constructor. The framework handles
finding and providing the class to the constructor. Include Microsoft.Extension.Options in controller to work with IOption collection.
using Microsoft.Extensions.Options;
public class TestController: Controller
{
    private readonly IOptions<BALSettings> _balSettings;
    private readonly IOptions<ServiceSettings> _serviceSettings;

    public TestController(IOptions<BALSettings> balSettings,
                          IOptions<ServiceSettings> serviceSettings)
    {
        _balSettings = balSettings;
        _serviceSettings = serviceSettings;
    }

    public IActionResult About()
    {
       ViewData["Source"] = _balSettings.Value.Source;
       ViewData["NewsMainUrl"] = _serviceSettings.Value.NewsMainUrl;
    }
}
Step 4: Access appsettings.json section in Class Library Project
Asp.Net Core DI resolve all dependencies before creating controller.
As we have already registered our model classes which are containing
relevant sections of appsettings.json in startup code.I have a class library project and I am accessing appsettings.json section in it using below code.
using Microsoft.Extensions.Options;

public class NewsService : INewsService
    {
        private readonly IOptions<ServiceSettings> _serviceSettings;

     public NewsService(IOptions<ServiceSettings> serviceSettings)
        {
            _serviceSettings = serviceSettings;
        }

        public string composeUrl()
        {
            return _serviceSettings.Value.NewsMainUrl + "&apiKey=" + _serviceSettings.Value.NewsApiKey;
        }
} If you want to access appsettings.json key/value data in class library project then you have to add Microsoft.Extensions.Options from NUGET to your relevant class library project, otherwise IOptions collection wouldn’t be accessible to class library project.
Nuget package manager console command:
PM> Install-Package Microsoft.Extensions.Options or using nuget package manager 
When to use Keep() vs Peek() with TempData in ASP.NET MVC
Monday, March 04, 2019
Vikas Sharma
TempData is used to pass data from current request
to subsequent request (means redirecting from one page to another). It’s
life is very short and lies only till the target view is fully loaded.
But you can persist data in TempData by calling Keep() method.
TempData with Keep method
If you want to keep value in TempData object after request completion, you need to call Keep method with in the current action. There are two overloaded Keep methods to retains value after current request completion.void Keep()
Calling this method with in the current action ensures that all the items in TempData are not removed at the end of the current request.
@{
 var tempDataEmployeet = TempData["emp"] as Employee; //need typcasting
 TempData.Keep(); // retains all strings values
}
void Keep(string key)
Calling this method with in the current action ensures that specific item in TempData is not removed at the end of the current request.
@{
 var tempDataEmployeet = TempData["emp"] as Employee; //need typcasting
 TempData.Keep("emp"); // retains only "emp" string values
}
keep() vs peek()
When an object in aTempDataDictionary is read, it will be marked for deletion at the end of that request.That means if you put something on TempData like
And on another request you access it, the value will be there but as soon as you read it, the value will be marked for deletion:TempData["value"] = "someValueForNextRequest";
//second request, read value and is marked for deletion
object value = TempData["value"];
//third request, value is not there as it was deleted at the end of the second request
TheTempData["value"] == null
Peek and Keep methods allow you to read
the value without marking it for deletion. Say we get back to the first
request where the value was saved to TempData.With
Peek you get the value without marking it for deletion with a single call:With//second request, PEEK value so it is not deleted at the end of the request object value = TempData.Peek("value"); //third request, read value and mark it for deletion object value = TempData["value"];
Keep you specify a key that was marked for deletion
that you want to keep. Retrieving the object and later on saving it
from deletion are 2 different calls.//second request, get value marking it from deletion object value = TempData["value"]; //later on decide to keep it TempData.Keep("value"); //third request, read value and mark it for deletion object value = TempData["value"];
Tempdata helps to preserve values for a single request and CAN ALSO preserve values for the next request depending on 4 conditions”.
You can usePeek when you always want to retain the value for another request. Use Keep when retaining the value depends on additional logic.
Condition 1 (Not read):- If you set a “TempData” inside your action and if you do not read it in your view then “TempData” will be persisted for the next request.
Condition 2 ( Normal Read) :- If you read the “TempData” normally like the below code it will not persist for the next request.
Condition 3 (Read and Keep) :- If you read the “TempData” and call the “Keep” method it will be persisted.Even if you are displaying it’s a normal read like the code below.string str = TempData[“MyData”];
@TempData[“MyData”];
Condition 4 ( Peek and Read) :- If you read “TempData” by using the “Peek” method it will persist for the next request.@TempData[“MyData”]; TempData.Keep(“MyData”);
string str = TempData.Peek("Td").ToString();
Monday, February 25, 2019
Thursday, February 21, 2019
Monday, February 4, 2019
jQuery Convert JSON Data to HTML Table using jQuery Row Append Properties
Monday, February 04, 2019
Vikas Sharma
